Friday, December 21, 2012

Tired of limp elf limbs?

I know I am. Ha!

I was getting so frustrated at this whole Elf On The Shelf thing because I was so limited! This stinking elf wouldn't pose the way I wanted her to or the glue dots I would use wouldn't stick. By morning she'd just look limp and silly.

Tonight I had a moment. A real moment of genius! 

Granted I have only two more nights of Lilliana Roxelle Josette (yes, that's the name my barely 5 year old gave her), so I'm a little slow, but it is amazing nonetheless! I decided that what this elf needs is wire in her limbs! 

Yes! I know!! Why didn't I think of it sooner!

Here's how I did it.

I grabbed some paddle wire because that's what was in reach. 

I pulled a long piece of twisted it and twisted it to itself to give it strength and folded it the twisted a little more to get it the right length. 

I'm sorry Lilliana....this might hurt a little....

Then I snipped a teeny tiny hole in the bottom if Lilliana's arm and at her leg seams.


Then I stuck the wire in, gave her a little stitch, and away we go!


Hey, hold this for me, would ya? Because now you CAN!


Poseable!! Yay!!!


Look! She can hold a crayon!   


And pop her little leg! Yes!


You're welcome :)

~Jessie



Sunday, December 16, 2012

Taco casserole

I'm not a good DIY blogger.  I don't remember to photograph beautifully every step of a process while I'm cooking dinner, sewing, crafting, creating....etc.....  I don't have an amazing camera to capture food in a spectacularly appetizing way.  You're just going to have to take my word that this is a super tasty, super easy recipe to make with stuff you have on hand in your pantry.

As my mom says.... Try it! You'll like it!


Cheesy Taco Casserole

* 1 lb ground beef - browned, drained
* 1/2 - 1 small onion - chop, cook with beef
* 1/2 - 1 green pepper - chop, cook with beef
* 1 1/2 - 2 packets taco seasoning - add to cooked beef mixture with 
* 2/3 cup water - simmer 5 minutes or so.

Add to meat mixture:
* 2 cups dry pasta - boiled, drained
* 1 can black beans - drain, rinse
* 1 can corn - drain
* 1 can diced tomatoes - I used fire roasted with garlic
* 1 can tomato soup
* 2 cups grated cheddar cheese divided in half - 
                           1 to mix in, 1 to put on top at the end

Preheat the oven at 350. 

Cook the meat, onion & peppers in a large (12") iron skillet on the stove top.  Add the water and taco seasoning and simmer for about 5 minutes.  Stir in everything else, including 1 cup of cheese, cover with foil, and then transfer to the oven for 30 minutes to heat through. Then remove the foil, add the extra cheese and bake, uncovered, another ten minutes or so.  

I like that this is a one skillet meal.  But if you don't have a giant iron skillet, you can just transfer it to a large casserole dish and bake as directed. 


Enjoy!
~Jessie

Wednesday, December 12, 2012

Thomas the Train Birthday Party

My son is crazy about Thomas the Train.  I mean c-r-a-z-y.  So naturally he decided to have a train party! It was pretty fun to put together, actually!  

Here's some of the highlights:

I made a few railroad crossing signs out of some balsa wood pieces I got at the craft store. Then, I picked up a Christmas tree box from work and turned it into "Gordon - the number 4 blue engine"!  

Two to three boys could run around in him at one time!  It was great!   There is a space in the back to carry things, and a funnel to stuff toys into as well - super fun! I just cut the box, taped pieces here and there, and then covered it in blue wrapping paper. The details were made with thin electrical tape.  and I drew the face then stuck him on! Easy peasy. 


To go along with Gordon, I decided he needed a track on the floor!  Now, in hindsight - I would not have used electrical tape.  No one tells me these things until afterward when the men are buzzing around saying things like "I hope that comes up" or "That's going to ruin the carpet" or "I wonder how much residue that's going to leave on the floor"  Ofcourse, they couldn't say all of those thoughts while I'm putting the tape down right. in. front. of. them. The blue painters tape was not a problem, and honestly, the electrical tape wasn't a problem either, except that if left longer it could have really messed my carpet up. So, use painters tape. NOT electrical tape, as I did.   But put down a track because it's super cute! 

We also had a table full of coloring pages for the boys.  It didn't see much action since there were trains to play with, food to eat, and races to be had.  But it was used occasionally, I think as a resting spot.  It worked :) 


Now, the real fun was had at the table! 

I made tracks on the table as well as on the floor - only here I KNEW only to use masking tape.  ;) 

I also used one of  L's paper train mats as the centerpiece of the table and added Trains and train cars that I made from Little Debbie Swiss Cake Rolls, miniature Reese cups, miniature 3-musketeers, miniature Oreos, and candy melts. Really easy. The thing that was so cute, though, was the silver curly ribbon 'steam' coming out of the funnel! 

I saw this idea somewhere and had a heck of a time finding loaf pans this time of year!  But I was persistent and it paid off - look how cute!  I love the Oreo wheels :) And they are just the right size for our big Percy flashlight and remote control Thomas! 

Mmmmm....train cars full of favorites!!  (The pretzel rods look like 'Jobe wood' - if you've got a bit of Thomas brain like I have now, you'll know what I mean! Haha!) 

I could have gone over the top with the cake, like some of the masterpieces floating around on the internet, but I just didn't have time, and frankly I don't love cutting cake! It's always such a mess. I like our cupcakes, though, and everyone was happy! The cupcake toppers were easy to make with some images online and toothpicks :) 


Table pre-drinks and by the way - how convenient was it that we happened to decorate a gingerbread train a couple days before!?  

Happy Birthday, buddy!

~Jessie

Winter Pine Cones

I made these fun little winter pine cones to cheer me up this winter,
because where I live in Ohio we never ever see the sun. Seriously. Never. It's so depressing. 
These pretty little lovelies ought to help a bit.


They're really easy. I just used left over wall paint (white & dark grey) and glitter.
I dipped them in the paint, holding them over it for a minute until they stop dripping.
Put them on foil or wax paper on a cookie sheet to dry.
While they were still wet I added glitter. I did keep moving them to new spots as they dried
because the paint would pool under them. Took about 24 hours to dry.

I've seen online where people used some sort of hanger to dip them. Just use your fingers! So they get paint on them, big deal. It washes off and it's way easier than trying to finagle a hook around them.
They did close up a bit as they dried, but I'm still happy with them.
They have a crisp, clean look.  My fave is the dark gray with dark gray glitter.  Enjoy!
                --Becky

Monday, December 10, 2012

Christmas Decor

Is it possible I've gone a little Christmas crafting wild? I usually prefer sewing projects, but for some reason, this year it's all about the crafts. I'm just bored with all my same old decor, which doesn't take long, so add a little new to old grime and I'm happy again! Crafting is such a mood lifter.

Since Jessie added so many wreaths on her previous post I was inspired enough to finally make a couple I've been eyeing on Pinterest.

Classic burlap bubble wreath (super easy!) I did this while my kids napped. I'm all about doing projects that only take a nap time or a day. 


I did another version using a metal clothes hanger bent into a circle, with strips of burlap folded onto it. Adding it to my mirror in my living room gave it a fresh change. (I think so, anyway!)


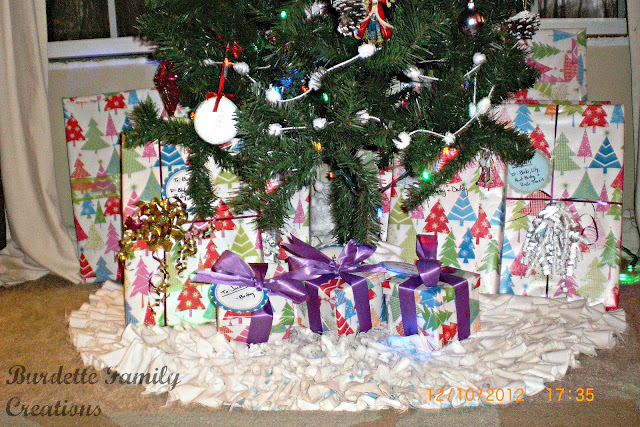
Along with the wreaths I made this super fantastic no sew tree skirt! For the last 5 years, I've only used a blanket or fabric for my tree skirt. Every year I said, "I'm not buying a tree skirt, I'll make one" Well, my husband it working A LOT so I've got plenty of time and tada! It happened! Again, thank you pinterest!
 Ooooh, look at all that ruffly goodness!!! Now add a gift....(to your sister!)

 ....and then add more gifts!


I do have some more to share, but I have to wait until AFTER Christmas because they're gifts for certain people who also blog here *wink wink*
Thanks for looking!
---Becky

Sunday, December 9, 2012

Wreaths!

 I've been on a bit of a wreath kick lately.  
I have enjoyed layering natural elements with soft fabrics, textures, and some glitz!

This first wreath I made for a friend of mine to hang on a black front door.  She wanted it visible but not "overly ostentatious" .  I used a straw wreath layered with a grapevine wreath.   


I love the icy pine cones :) 

I made this one for another friend of mine.  She loves purple, but her husband isn't as big of a fan, so I tried to make it a little understated.  It's layering of the grapevine and straw wreaths again that I wrapped with a really vintage-looking violet fabric that helped it not be SO purple.   


I made this one for my mom.  I like the color combination on this one. I hung it with a wide red ribbon and it brought the color full circle. 


This one, well two - I have a double front door -  I made for myself this past Autumn.  I have a covered porch, so I felt it was okay to use feathers in the arrangement.  I love all the different textures. 
Apparently I liked layering the wreath frames this year.


 And this is a couple that I made for myself for Christmas.  Sorry, the pictures aren't really clear.  I wrapped a straw frame and then rolled the edges of paper circles in glitter and then stuck them onto the frame like 'flowers'.  I really love these wreathes! I used them last Christmas and they weathered so well, that I am using them again this year! 


 Thanks for looking!
~Jessie

Saturday, December 8, 2012

E's My Little Pony Birthday Party

I have a pretty busy couple of weeks this time of year.  Thanksgiving and 3 birthdays hit within 10 days of each other usually!  It's crazy busy.  I honestly don't know how I survive.  

Here are a few pictures from my daughter's birthday party.  
She's a big fan of the new My Little Pony: Friendship is Magic series, and she just had to have a party featuring them!  

So here is the party table! I made a rainbow on the wall (unfortunately for picture's sake, it had to be in front of a window) made of tulle that I purchased at JoAnn's.  I had some poly-fill in the basement that I used to make a cloud, and I also came across these super cute twinkling star battery operated Christmas lights that I wove into the cloud! It turned out super cute.  
 
I got the inspiration for the rainbow here


The gift table was pretty simple - fuchsia satin cloth, purple "pony tail" ribbons, and balloons hanging from the ceiling.  

The show stopper was the cake!  My mom and my cousin made the cake and it turned out so Ah-Mazing!
E's favorite character is Rainbow dash and my cousin, Allie painted her on top, while my mom, Jo Ellen, baked the cake and decorated the sides with Skittles.  It was awesome.


It was a RAINBOW CAKE!!!  I was even surprised when I cut into it!  


I also made these super cute party favors!  I picked up nail polishes that matched the colors of each pony character, and then made curly ribbon "manes" that matched the ponies as well!  I then glued on pictures of the ponies for E's sake.  I threw them in a clear bag with a pretty nail file, a pony fruit snack pack and sealed it all up with a rainbow ribbon and paper cloud. Adorable! 


Thanks for looking!
~ Jessie